Uncategorized

HOW TO BYPASS URL SHORTNER

​​ HOW TO BYPASS URL SHORTNER 
ғᴏʀ ʙʏᴘᴀssɪɴɢ ᴜʀʟ sʜᴏʀᴛᴇɴᴇʀs ᴀɴᴅ ᴀᴜᴛᴏᴍᴀᴛɪᴄᴀʟʟʏ ᴘʀᴏɢʀᴇssɪɴɢ, ᴅᴏ ᴛʜᴇsᴇ sᴛᴇᴘs.
1) ᴅᴏᴡɴʟᴏᴀᴅ ᴛʜᴇ ᴇxᴛᴇɴsɪᴏɴ ᴛᴀᴍᴘᴇʀᴍᴏɴᴋᴇʏ ᴏɴ ᴇɪᴛʜᴇʀ ᴄʜʀᴏᴍᴇ ᴏʀ ғɪʀᴇғᴏx
2) ɢᴏ ᴛᴏ ᴛʜɪs ᴡᴇʙsɪᴛᴇ: adsbypasser.github.io
3) ɪɴsᴛᴀʟʟ ᴛʜᴇ ᴇʟɪᴛᴇ ᴠᴇʀsɪᴏɴ sᴄʀɪᴘᴛ (ɪᴛs ғʀᴇᴇ) ᴀɴᴅ ᴛʜᴇʀᴇ ʏᴏᴜ ɢᴏ.
ɴᴏᴡ ʏᴏᴜ ᴄᴀɴ ᴠɪsɪᴛ ᴀɴʏ ᴀɴɴᴏʏɪɴɢ sʜᴏʀᴛᴇ .sᴛ ᴏʀ ᴀɴʏ ᴏᴛʜᴇʀ ᴜʀʟ sʜᴏʀᴛᴇɴᴇʀ ᴀɴᴅ ᴛʜᴇ sᴄʀɪᴘᴛ ᴡɪʟʟ ʙʏᴘᴀss ᴛʜᴇ ᴛɪᴍᴇ ᴛʜᴀᴛ ʏᴏᴜ ʜᴀᴅ ᴛᴏ ᴡᴀɪᴛ ʙᴇғᴏʀᴇ
 ᴄᴏᴘʏ ᴡɪᴛʜ ᴄʀᴇᴅɪᴛs ᴇʟsᴇ ɢᴇᴛ ғᴜᴄᴋᴇᴅ ɪ ᴍ ᴠᴇʀʏ sᴇʀɪᴏᴜs ɴᴏᴡ ʀᴇɢᴀʀᴅɪɴɢ ᴄᴏᴘʏɪɴɢ ᴡɪᴛʜᴏᴜᴛ ᴄʀᴇᴅɪᴛs 
Uncategorized

HOW TO UNBLOCK YOURSELF ON WHATSAPPIF SOMEONE BLOCKS YOU

HOW TO UNBLOCK YOURSELF ON WHATSAPP
IF SOMEONE BLOCKS YOU 
Step 1: Write down your blocker’s phone
number
If you have the contact that blocked you saved
on your phone, write it down somewhere and
delete it from your phone.
Step 2: Back up your chats
I believe you already know how to back up your
WhatsApp chat (both messages and media files).
Well, if you don’t then here is a quick guide to
creating a Google Drive backup:
Open WhatsApp.
Go to Menu Button > Settings > Chats > Chat
backup.
 Tap Back up to Google Drive and set up the
backup frequency to your liking.
 You will be prompted to select a Google
account that you will back up your chat history
to. If you do not have a Google account, tap Add
account when prompted. Please remember the
Google account you are using for the backup.
 Tap Back up over to choose the network you
wish to use for backup. Please note that backing
up over cellular may result in additional data
charges.
Step 3: Delete your WhatsApp account Go to account settings on your WhatsApp and
delete your account.
By deleting your number, it means you are no
longer active on WhatsApp so technically, you
cannot block someone who’s not on WhatsApp.
Whoever blocks you will no longer have you on
the blocked list.
Step 4: Clear WhatsApp data
 Now go to your phone settings > app >
WhatsApp and clear the data.
Step 5: Reactivate WhatsApp
 Open your WhatsApp and register your
number on the WhatsApp platform. This time,
you are registering for the first time over again.
Step 6: Restore Chats
 Restore your chat back up.
 Make sure the same Google account that
was used to perform the backup has been added
to your phone.
 Uninstall and reinstall WhatsApp.
 After verifying your number, you will be
prompted to restore your messages and media
from Google Drive.
 After the restoration process is complete,
tap Next and your chats will be displayed once
initialization is complete.
 After restoring your chats, WhatsApp will
begin restoring your media files.
NOTE: You need to restore from the backup on
your google drive but if you didn\’t do so,
WhatsApp will automatically restore the backup
from your local storage memory which could be
SDcard or phone internal memory as the case
may be.
Step 7: Re-add contact
Lastly, save the contact you wrote down earlier
back on your phone. Now look for the person/
contact that blocked you in the first place and
send a message.
This is how to unlock your WhatsApp account
whenever someone blocks you.
I hope this is helpful.
Uncategorized

Advance Android Programming and Developing Course.

Advance Android Programming and Developing Course. 
FREE OF COST 
WHICH COST $ 1000 💵 
DOWNLOAD LINK 🔗 :
Who this course Designed and Made for?
Those people love Security.
Those people love Hacking.
Those people want to increase the Security page in your application.
Those people have business with Application.
FOLLOW THE DOWNLOAD INSTRUCTIONS WHICH GIVEN IN WEBSITE TO DOWNLOAD..
( COVERED ALL THE LATEST ADVANCE LEVEL METHODS ) 2020
DOWNLOAD LINK 🔗 :
COPY WITH CREDITS LIMITED EDITION 
SHARE AND SUPPORT US ON 
Uncategorized

How to increase Virtual RAM to Make Your System Faster

How to increase Virtual RAM to Make Your System Faster
1. Press and Hold down the \’Windows\’ Key and Press the \’Pause/Break\’ button at the top right of your keyboard. Or simply Right-Clicking \’My Computer\’ and then Select \’Properties\’.
2. Click on the \’Advanced\’ tab.
3. Under \’Performance\’, click \’Settings\’.
4. Then click the \’Advanced\’ tab on the button that pops up.
5. Under \’Virtual Memory\’ at the bottom, click \’Change\’.
6. Click the \’Custom Size\’ button.
7. For the initial size (depending on your HD space), type in anywhere from 1000-1500 (although I use 4000), and for the Maximum size type in anywhere from 2000-2500 (although I use 6000).
8. Click \’Set\’, and then exit out of all of the windows.
9. Finally, Restart your computer.
10. You now have a faster computer and 1-2GB of Virtual RAM.
Uncategorized

CCNA Complete Courses Free Download

CCNA Complete Courses Free Download 

 The Cisco Certified Network Associate (CCNA) certification is the second level of Cisco’s five-level career certification process. A CCNA certification certifies a technician’s ability to install, set up, configure, troubleshoot and operate a medium-sized routed and switched computer network. This also includes implementing and verifying connections to a wide area network (WAN).
◾️ CCNA Security Latest Course Download:
◾️ CCNA Wireless Latest Course Download:
◾️ CCNA Service Provider Latest Course Download:
◾️ CCNA Cyber Ops Latest Course Download:
◾️ CCNA Data Center Latest Course Download:
◾️CCNA Routing and Switching Latest Course Download:
◾️CCNA Cloud Latest Course Download:
◾️ CCNA Collaboration Latest Course Download:
Uncategorized

Types of Cybercrime

Types of Cybercrime 
ᴛʜᴇ ғᴏʟʟᴏᴡɪɴɢ ʟɪsᴛ ᴘʀᴇsᴇɴᴛs ᴛʜᴇ ᴄᴏᴍᴍᴏɴ ᴛʏᴘᴇs ᴏғ ᴄʏʙᴇʀᴄʀɪᴍᴇs:
ᴄᴏᴍᴘᴜᴛᴇʀ ғʀᴀᴜᴅ:
 ɪɴᴛᴇɴᴛɪᴏɴᴀʟ ᴅᴇᴄᴇᴘᴛɪᴏɴ ғᴏʀ ᴘᴇʀsᴏɴᴀʟ ɢᴀɪɴ ᴠɪᴀ ᴛʜᴇ ᴜsᴇ ᴏғ ᴄᴏᴍᴘᴜᴛᴇʀ sʏsᴛᴇᴍs.
ᴘʀɪᴠᴀᴄʏ ᴠɪᴏʟᴀᴛɪᴏɴ:
 ᴇxᴘᴏsɪɴɢ ᴘᴇʀsᴏɴᴀʟ ɪɴғᴏʀᴍᴀᴛɪᴏɴ sᴜᴄʜ ᴀs ᴇᴍᴀɪʟ ᴀᴅᴅʀᴇssᴇs, ᴘʜᴏɴᴇ ɴᴜᴍʙᴇʀ, ᴀᴄᴄᴏᴜɴᴛ ᴅᴇᴛᴀɪʟs, ᴇᴛᴄ. ᴏɴ sᴏᴄɪᴀʟ ᴍᴇᴅɪᴀ, ᴡᴇʙsɪᴛᴇs, ᴇᴛᴄ.
ɪᴅᴇɴᴛɪᴛʏ ᴛʜᴇғᴛ: 
sᴛᴇᴀʟɪɴɢ ᴘᴇʀsᴏɴᴀʟ ɪɴғᴏʀᴍᴀᴛɪᴏɴ ғʀᴏᴍ sᴏᴍᴇʙᴏᴅʏ ᴀɴᴅ ɪᴍᴘᴇʀsᴏɴᴀᴛɪɴɢ ᴛʜᴀᴛ ᴘᴇʀsᴏɴ.
sʜᴀʀɪɴɢ ᴄᴏᴘʏʀɪɢʜᴛᴇᴅ ғɪʟᴇs/ɪɴғᴏʀᴍᴀᴛɪᴏɴ:
 ᴛʜɪs ɪɴᴠᴏʟᴠᴇs ᴅɪsᴛʀɪʙᴜᴛɪɴɢ ᴄᴏᴘʏʀɪɢʜᴛ ᴘʀᴏᴛᴇᴄᴛᴇᴅ ғɪʟᴇs sᴜᴄʜ ᴀs ᴇʙᴏᴏᴋs ᴀɴᴅ ᴄᴏᴍᴘᴜᴛᴇʀ ᴘʀᴏɢʀᴀᴍs ᴇᴛᴄ.
ᴇʟᴇᴄᴛʀᴏɴɪᴄ ғᴜɴᴅs ᴛʀᴀɴsғᴇʀ:
 ᴛʜɪs ɪɴᴠᴏʟᴠᴇs ɢᴀɪɴɪɴɢ ᴀɴ ᴜɴ-ᴀᴜᴛʜᴏʀɪᴢᴇᴅ ᴀᴄᴄᴇss ᴛᴏ ʙᴀɴᴋ ᴄᴏᴍᴘᴜᴛᴇʀ ɴᴇᴛᴡᴏʀᴋs ᴀɴᴅ ᴍᴀᴋɪɴɢ ɪʟʟᴇɢᴀʟ ғᴜɴᴅ ᴛʀᴀɴsғᴇʀs.
ᴇʟᴇᴄᴛʀᴏɴɪᴄ ᴍᴏɴᴇʏ ʟᴀᴜɴᴅᴇʀɪɴɢ:
 ᴛʜɪs ɪɴᴠᴏʟᴠᴇs ᴛʜᴇ ᴜsᴇ ᴏғ ᴛʜᴇ ᴄᴏᴍᴘᴜᴛᴇʀ ᴛᴏ ʟᴀᴜɴᴅᴇʀ ᴍᴏɴᴇʏ.
ᴀᴛᴍ ғʀᴀᴜᴅ:
 ᴛʜɪs ɪɴᴠᴏʟᴠᴇs ɪɴᴛᴇʀᴄᴇᴘᴛɪɴɢ ᴀᴛᴍ ᴄᴀʀᴅ ᴅᴇᴛᴀɪʟs sᴜᴄʜ ᴀs ᴀᴄᴄᴏᴜɴᴛ ɴᴜᴍʙᴇʀ ᴀɴᴅ ᴘɪɴ ɴᴜᴍʙᴇʀs. ᴛʜᴇsᴇ ᴅᴇᴛᴀɪʟs ᴀʀᴇ ᴛʜᴇɴ ᴜsᴇᴅ ᴛᴏ ᴡɪᴛʜᴅʀᴀᴡ ғᴜɴᴅs ғʀᴏᴍ ᴛʜᴇ ɪɴᴛᴇʀᴄᴇᴘᴛᴇᴅ ᴀᴄᴄᴏᴜɴᴛs.
ᴅᴇɴɪᴀʟ ᴏғ sᴇʀᴠɪᴄᴇ ᴀᴛᴛᴀᴄᴋs:
 ᴛʜɪs ɪɴᴠᴏʟᴠᴇs ᴛʜᴇ ᴜsᴇ ᴏғ ᴄᴏᴍᴘᴜᴛᴇʀs ɪɴ ᴍᴜʟᴛɪᴘʟᴇ ʟᴏᴄᴀᴛɪᴏɴs ᴛᴏ ᴀᴛᴛᴀᴄᴋ sᴇʀᴠᴇʀs ᴡɪᴛʜ ᴀ ᴠɪᴇᴡ ᴏғ sʜᴜᴛᴛɪɴɢ ᴛʜᴇᴍ ᴅᴏᴡɴ.
sᴘᴀᴍ: 
sᴇɴᴅɪɴɢ ᴜɴᴀᴜᴛʜᴏʀɪᴢᴇᴅ ᴇᴍᴀɪʟs. ᴛʜᴇsᴇ ᴇᴍᴀɪʟs ᴜsᴜᴀʟʟʏ ᴄᴏɴᴛᴀɪɴ ᴀᴅᴠᴇʀᴛɪsᴇᴍᴇɴᴛs.
Uncategorized

Make Access On WhatsApp Accounts With Phishing Attack!

Make Access On WhatsApp Accounts With Phishing Attack!
In WhatsApp-Phishing hacker or attacker send a fake login page of whatsapp to victim and once victim enter their phone number and OTP (One Time Password) then attacker or hacker can retrieve it and access victim account.
Requirements:-
Apache Server
Ngrok
Root
Installation Of WhatsApp-Phishing
$ cd whatsapp-phishing 
$ sudo bash Whatsapp.sh 
Now enter your details and it will generate a phishing link for you send it to victim and phish their credentials.
Note :- This information is only for educational purpose
Uncategorized

BEST 10 WEBSITE THAT EVERY PROFESSIONAL HACKER USE

BEST 10 WEBSITE THAT EVERY PROFESSIONAL HACKER USE
NAMES-
Dnsdumpster :- dns recon & research , find & lookup dns records
Verify email address :- Verify email address online using free email verification tool.
ZOOMEY :- find iot device and bugs in android WordPress PHPMyAdmin and much more
Search CVE List :- Common Vulnerabilities and Exposures (CVE®) is a list of entries — each containing an identification number, a description, and at least one public reference — for publicly known cybersecurity vulnerabilities.
NATIONAL VULNERABILITY DATABASE :- NVD is the U.S. government repository of standards-based vulnerability management data represented using the Security Content Automation Protocol (SCAP). This data enables the automation of vulnerability management, security measurement, and compliance. NVD includes databases of security checklists, security-related software flaws, misconfigurations, product names, and impact metrics
GREYNOISE :- GreyNoise Intelligence is a cyber security company that collects, labels, and analyzes Internet-wide scan and attack data.
SEEBUG 1 :- You can find bugs here
SHODAN :- Shodan is the world’s first search engine for Internet-connected devices. … Use Shodan to discover which of your devices are connected to the Internet,
Website Vulnerability Scanner :- The Web Vulnerability Scanner finds website vulnerabilities like SQLi, XSS, server misconfiguration and many more. Use our Website Scanner to check your web security.
Hack This Site :- HackThisSite! is a legal and safe network security resource where users test their hacking skills on various challenges and learn about hacking and network security. Also provided are articles, comprehensive and active forums, and guides and tutorials. Learn how to hack!“
Uncategorized

HOW TO TAKE OVER A POF ACCOUNT

HOW TO TAKE OVER A POF ACCOUNT 
1. Log into the POF.
2. Locate the *edit profile*
3. Scroll down to the end of the page where you see the option to change the email, change the email attached to the account to your desired email.
4. Click *Update email* you\’ll see a fresh page indicating that *_your email has been succesfully updated_*
5. Next, proceed to change the password, follow the directions and input the old password once and the new password twice and click the *Update password*, you\’ll be asked to re-login the account with your new password and former username.
6. When you log into the pof again with the old username and new password then the account has been successfully taken over.
NOTE :- 
The reason most people complain that they\’ve been logged out of their POF is because they work POF with VPNs, brethren if you are really serious with yourself you should buy an RDP and work your POF from your Rdp, nobody not even the owner of POF will log you out if you work your POF from an RDP.
Uncategorized

How To See Passwords for Wi-Fi Networks You\’ve Connected Your Android Device To

How To See Passwords for Wi-Fi Networks You\’ve Connected Your Android Device To

    The trouble comes when you want to actually see the password for one of the networks you connected to. Perhaps you want to connect a second device to a saved Wi-Fi access point, or maybe you\’re with a friend who wants to log in to the same hotspot. But without a way to access the actual passwords that your device has stored, you\’re out of luck.
Thankfully, there are ways around this. If you\’re on Android 10 or higher, you can see Wi-Fi passwords right from your phone\’s settings. However, if you\’re on Android 9.0 Pie or lower, note that you will need to be rooted.
 Method : Android 10 & Up
This first method doesn\’t require root or even an extra app. But it does require that your phone is running Android 10 or higher. If your phone has been updated to this version, I\’ll outline a quick and easy way to see saved Wi-Fi passwords below.
Step 1: Locate Wi-Fi Settings
 
 Currently, there is only one flavor of Android 10, and that\’s the \”Stock Android\” version directly from Google. However, in the near future, manufacturers like Samsung will put their own spin on Android 10 by applying an OEM skin such as One UI, which means the settings menus could be a little different on your phone.
 So first, search your phone\’s Settings menu for the \”Wi-Fi\” submenu. On Stock Android, that\’s located in Settings –> Network & internet. Once you\’ve found the Wi-Fi settings menu, go ahead and select it.
 Step 2: View Wi-Fi Passwords
One inside the Wi-Fi settings page, scroll past the list of available networks and select the \”Saved networks\” option. From there, you\’ll see a list of all the Wi-Fi networks your phone remembers. Select one.
 Now, choose the \”Share\” option towards the top of the screen. You\’ll be asked to scan your fingerprint or face or enter your PIN or password. Upon doing so, you\’ll see a QR code with that represents the network\’s SSID and password. You could scan this with another device using a QR scanner if you wanted, but the password is also listed in plain text beneath the QR code, so you can copy it from there
 Thats it you are done with it. I hope you Guys like this tutorial
Uncategorized

HOW TO HACK FACEBOOK ACCOUNTS USING KEYLOGGER

HOW TO HACK FACEBOOK ACCOUNTS USING KEYLOGGER
STEP 1: Create Server for Hacking Passwords
First of all, for hacking any Facebook account password, we have to create our keylogger server that will run on the victim’s machine, capturing his keystrokes and emailing us the record. The keylogger server building process consists of several steps:
1. First of all download the Keylogger and a good binder. Binders are easily available via a Google search. 
2. Extract the RAR file. Now you will get one folder and three files.
3. Open the Keylogger file. Here you will need a gmail ID and password. For safer use, create a fake Gmail account.
4. Click on server settings as shown. Here, enter the time at which you want to receive reports; it’s always preferable to use a 20 minute timer for receiving files. Click on the Output box to choose the location of the file and give it a name. We recommend using a system process name to make it undetectable, like svchost, or check any process name from your task manager and name it. Other fields are optional.
5. Click on Log and Result Setting. In Log Email Title enter the subject of email like “my keylogger report” or anything else that you you like. Click the last two options that add computer name and add the victim’s name.
6. Now click on “Other Options.” In this section you just have to do one thing. Most hackers prefer warning message POP up, but I prefer keylogger using any message – so unclick the message button. When you bind it with any other software it should not have a warning message attached, otherwise it will be detectable.
7. Finally click on Build Keylogger. You will see your keylogger file at the location that you have chosen in the 4th step. This keylogger server file will be used to bind with other software in Binding Step.
 8. Now your keylogger server is ready for you to hack Facebook accounts. 
Step 2: Extracting the icon file from any installer (resource hacker)
1. Open the resource hacker folder and select the reshacker file.
2. Go to its menu and open any setup file. Suppose we want to attach our keylogger to a Ccleaner setup file. Open the Ccleaner setup with resource hacker. 
3. In the menu, there is one action button. Click on it and then click save all resource.
 4. Save all the resources to the desktop or any other location of your choice.
5. It consists of two files. One is icon file and other is res file. We only need the icon file, so you can delete the other one.
6. That leaves us with the icon of installer file (Ccleaner setup icon).
Step 3: Bind the Keylogger server with any software
1. Go to keylogger folder and open the Binder.
2. Click on the button shown below to add files.
3. Add the keylogger server and the setup software (in our case it’s Ccleaner setup).
4. In the Binder menu, go to Settings. There, select the icon that we have generated in the previous step and set the location of the output file as shown in the figure.
5. Now again go to file’s menu in Binder and click on Bind files.
6. Now your Binded keylogger is ready. You just need to spread it or send it to the victim that is your friend.
Step 4: How to spread the keylogger
1. Now you have one software setup file with a keylogger attached to it. (In our case, we have Ccleaner setup with keylogger attached with it)
2. Spread your keylogger through forums. If you are a member of various forums, use them to spread your keylogger in the form of software posts.
3. Spread it through pendrives or USB hard drives. Suppose a friend asked you for a software, give them the software with the keylogger attached to it on the hard drive. 
Note: you can also attach keyloggers to images, but that can be detectable by antivirus, so we recommend avoiding that route.
Hacking someone’s Facebook account takes more than a few minutes
Uncategorized

Free Masters in Ethical Hacking Advance Course.

 Masters in Ethical Hacking Advance Course. 

WHICH COST AROUND COST $ 2k 
But now [100% Free Of Cost.]
       
Masters in Ethical Hacking Advance Course.
DOWNLOAD LINK 🔗 :
THIS IS VERY IMPORTANT COURSE TO NEXT LEVEL IN YOU ETHICAL HACKING JOURNEY..
FOLLOW THE DOWNLOAD INSTRUCTIONS WHICH GIVEN IN WEBSITE TO DOWNLOAD..
( THE LATEST ADVANCE LEVEL COURSE ) 2020
COPY WITH CREDITS LIMITED EDITION…
Follow the steps

1 install Aircrack-Ng 
 
Let\’s get into monitoring network activity. 
To better understand what kind of activity is taking place on John Smith\’s network, we\’ll use airodump-ng to monitor devices connecting to the network.
 Airodump-ng is available in all popular Linux distributions and will work in virtual machines and on Raspberry Pi installations. 
I\’ll be using Kali Linux to monitor Wi-Fi networks in my area.
Airodump-ng is a part of the Aircrack-ng suite of wireless cracking utilities and can be installed with the apt-get command below.
Command :- 
sudo apt-get install aircrack-ng


Enable Monitor Mode on Your Wireless Adapter 
Connect your wireless network adapter to your computer. Use the ifconfig command to find the name of your wireless adapter. 
It will most likely be named \”wlan0\” or \”wlan1.\”
When you\’ve identified the wireless adapter name, enable monitor mode with the airmon-ng command.
Command :-
sudo airmon-ng start YourAdapterName
Be sure to replace \”YourAdapterName\” with the actual name of your wireless network adapter. 
Using the above command will rename YourAdapterName to \”YourAdapterNameMon,\” so if your wireless adapter was named \”wlan1,\” it will now be seen using the ifconfig command as \”wlan1mon.\” 
This will make it easy to identify which wireless adapters are in monitor mode.
We can now start airodump-ng using the wireless adapter in monitor mode.
The –berlin part defines the amount of time the airodump-ng window will display devices connected to the router. 
By default, devices are displayed for only 120 seconds. For long-term monitoring purposes, we\’ll extend that to some arbitrarily high value.

 ​​3 

Launch Airodump-Ng 
Type the following into a terminal to start airodump-ng.
Command :- 
sudo airodump-ng YourAdapterNameMon
By default, airodump-ng will begin collecting and displaying wireless activity for every Wi-Fi network in your area. 
Let airodump-ng run for a minute or two, and press Ctrl + C to stop scanning.
I\’ll be targetting the \”My-Neighbor\” network, a wireless network I setup and control.
 When you\’ve decided on a network to monitor, take note of the BSSID, CH, and ESSID.
 BSSID is the MAC address of the router we\’ll be monitoring.
 CH is the channel the router is transmitting on. 
ESSID is simply the name of the Wi-Fi network. 
These three values are essential to monitoring one specific router.
To monitor a specific router using airodump-ng, use the below command.
Command :-
airodump-ng –berlin 99999 –bssid -c –essid YourApaterNameMon


Look Up MAC Addresses 
Pay close attention to the STATION column while airodump-ng is running.
​​This is where connecting devices will be displayed. 
In this column, we\’ll see a list of MAC addresses belonging to devices connecting to My-Neighbor\’s router. 
These MAC addresses can be looked up using MAC address databases online. 
Enter the first 6 characters of the MAC address to find the manufacturer of the device.

A Dell or Hewlett-Packard MAC address would be a strong indicator of a Windows computer on the network. 

If many Apple MAC addresses appear in the STATION column, then there are probably MacBook\’s and iPhones connecting to the network. 
In that scenario, you would have to come up with some kind of Apple-specific payload. 
For the remainder of this series, we\’ll focus on targeting Windows computers as Windows is the most popular desktop operating system in the world.
Now, Continue to Part 2 Which will soon be posted here
We\’ve discovered our target\’s real name and gained a general idea of the hardware being used on their home network. 
Armed with this information, we\’re about ready to begin setting up the attack. 
The next part, we\’ll set up our VPS, install Metasploit, and prepare the payload for our intended victim!
Uncategorized

How To Hack Your Neighbor with a Post-It Note, Part 1 (Performing Recon)

How To Hack Your Neighbor with a Post-It Note, Part 1 (Performing Recon) 
#hackingtutorials
Using just a small sticky note, we can trigger a chain of events that ultimately results in complete access to someone\’s entire digital and personal life.
Imagine arriving home one night after work and there\’s a Post-it note on your apartment door with the website \”your-name-here.com\” written on it.
 Someone cautious may not immediately visit the website, but eventually, curiosity might get the best of them. 
Let\’s have some fun exploiting human curiosity and get remote access to our neighbor\’s computer in the process.
For this hack, we\’ll be using a seemingly harmless Post-it note to entice a target user into visiting a website that we control. 
When the target user visits the website, they\’ll be tricked into opening a malicious file which will allow us to perform a variety of attacks on the compromised computer.
 Such an attack may allow hackers to target: 
Coworkers or company executives. 
Employees visiting an attacker-controlled website from a computer inside a corporate network and opening a malicious file may compromise the security of the entire network.
Small businesses. Managers opening malicious files found on attacker-controlled websites may allow the attacker to steal sensitive customer information, install ransomware, or compromise other applications on the device.
Average everyday people. Gaining remote access to a someone\’s computer, attackers could steal personal information to perform identity theft or blackmail the victim into paying a large ransom for stolen data.
Understanding Our Sticky Note Attack 
There are many steps to this attack, so I\’ll first provide a brief overview of the scenario before showing how to put it all together.
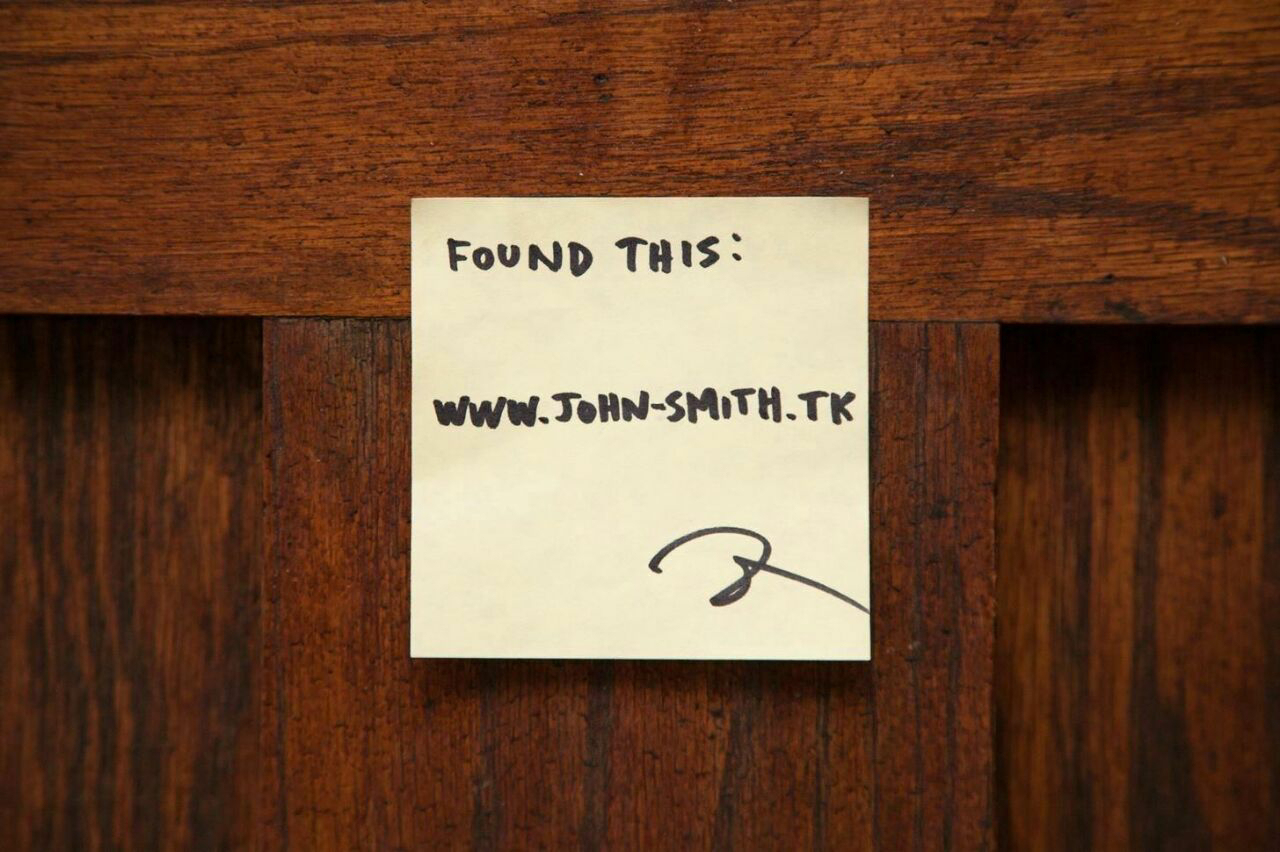
The hypothetical victim of this hack will be \”my neighbor in the apartment next door,\” his name is \”John Smith.\” 
The goal is to social engineer John Smith into visiting a website that we control by exploiting the inherent trust we allot to our everyday neighbors.
 Ultimately, we will gain access to a computer in John\’s apartment by tricking him into opening a malicious file.
Since there\’s a lot going on in this attack, I will be breaking this guide up into three parts.
 This first part will cover reconnaissance. 
We\’ll need to gather as much information about John Smith\’s social and digital life to create a website named after him that will really entice him (\”john-smith.com\”). 
As an optional step, we\’ll also gather hardware information about devices connecting to John\’s Wi-Fi network. 
This will help us understand what kinds of devices are in his home.
In the second part of this guide, we\’ll create a payload to run on a Virtual Private Server (VPS) so that it can be downloaded from any computer in the world. 
We\’ll also need to install Metasploit on the VPS, which will be used to interface with and control the compromised machine after our malicious file is opened.
Step 1 

Know Your Target 
Reconnaissance is very important to the success of this hack. 
There are many social engineering angles we can take to trick someone into visiting our evil website. 
For example, targeting our neighbor in the apartment next door would be easy. 
In some apartment buildings and condominiums, we could identify our neighbor\’s name by checking the resident listed on the lobby intercom or their mailbox.
We can also learn their name by creating small talk with them or other people who live or work in the building who might unwittingly divulge personal information about our target.
 People who live in rural areas may have better luck using whitepages to identify names of residents in the house next door. 
In certain parts of the United States, property history may be easily obtainable. 
A parcel, county auditor, or property assessment Google inquiry with the targets corresponding county may produce a searchable database of current and past residents for the target\’s home address.
The goal here is to find something that would interest our victim into visiting the website we control. 
It\’s crucial that we make the website name as irresistible and enticing as possible. 
If all else fails, we can always try \”john-smith-nudes.com\” to get someone\’s attention. 
Even omitting the name and using more of riddle could help the recipient feel like their in the middle of their own mystery film.
​​In extreme cases, we might also learn our target\’s name by rummaging through their trash bins and finding a letter, package, or receipts containing personal information we can use in later stages of this attack. 
In a big city, rummaging through trash bins might not even get a second glance from people.
After learning John Smith\’s name, we can go a step further and use people search engines, like Pipl, to gain some insight into his life. 
Pipl is free and very easy to use. Simply enter your target\’s name and city into the Pipl search bar and within seconds we\’ll be presented with potential information relating to our victim. 
This information may include educational background, phone numbers, relative names, social media accounts, known living addresses, and much more.
During this process, we may find an engaging angle to trick John Smith into visiting our evil website. 
For example, if John was a raging Philadelphia Eagles fan on Instagram, \”john-smith-philly-eagles.com\” would probably be more than enough to spike John\’s curiosity. 
If our neighbor tweeted their horoscope most mornings, \”john-smith-capricorn.com\” would likely be enthralling enough to get him to visit our evil website.
 Step 2 

 Know Your Target\’s Hardware (Optional) 
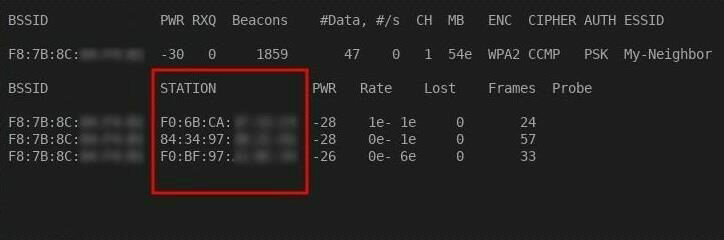
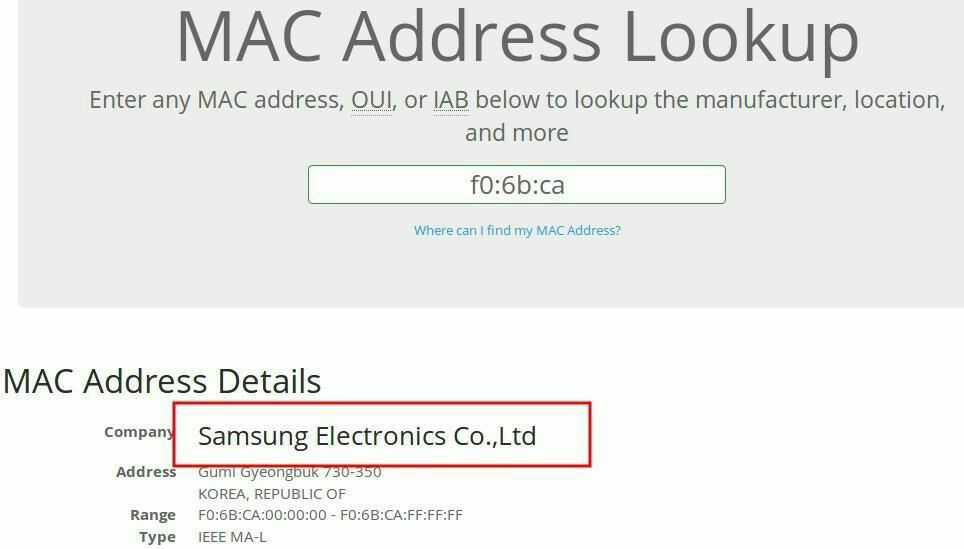
Identifying devices connecting to John Smith\’s network is also very important to the success of this attack. 
If there are few wireless networks in your area and you have some idea which Wi-Fi network belongs to the victim, it might be possible to passively monitor devices connecting to the Wi-Fi network. 
Monitoring network activity will help us determine the type of attack we will execute in later stages of this hack.
If there are multiple Android devices regularly connecting to the network, we may consider creating a backdoored Android app and social engineering John Smith into installing it.
 Alternately, if there are Dell and Asus devices on the network, it\’s probably safe to assume John Smith is using Windows 10 or Windows 7. 
In that case, we would prepare some kind of Windows-specific payload.
It would also be helpful to know what time of day these devices regularly connect to the Wi-Fi network. 
With this information, we\’ll know when to expect new connections on your VPS and Metasploit session.
Uncategorized

How To Get Free VPN For Port Forwarding on Android

How To Get Free VPN For Port Forwarding on Android 
This Tutorial is Only for Educational Purpose. Please Don\’t Misuse of it. Else This is Your Reponsibility.
Step 1:- Open Browser and Type free-proxy.xyz
Step 2:-Then Unblock ipjetables.net (Some Times it Requires Proxy)
Step 3:-Make A Fake Account Via Temp-Mail
Step 5:- Open Settings and Search VPN
Step 6:-Now Add a VPN
As pptp & put pptp.ipjetable.net
Step 6:-Now Add Password and Username
Now You are Done
Uncategorized

Hacking Any Social Media Account

 Hacking Any Social Media Account 
The first step is to open an account with this Hacking sites 
Sites used:
After opening account with any one of them and logging in
You would see different phishing links there
Copy your preferred one but be warned the links are usually long so use either bit.ly or goo.gl or any other link shorter to shorten it
Then paste it to your victims 
You can convince them by lieing like this
(There is a new site that pays
Log in to get started )
As soon as they log in their log in email and password will be sent to you 
That\’s it !!! 
You have successfully hacked a Facebook/Any social media account
Uncategorized

How to Install and Run Kali Linux on any Android Smartphone

 How to Install and Run Kali Linux on any Android Smartphone 
 First of all download and install Linux Deploy App in your android from the Google Play Store.
 Now After downloading and installing it launch the app in your device and there tap on download button. 
 Now there tap on Distribution option and change it to Kali Linux instead of Linux.
Now scroll up and click on the Install button at the top of there.
 Now wait for the download to complete time taken can be vary depending upon your internet speed.
 Now download and install VNC Viewer App in your android from the Play Store.
 Now launch the app and fill up the settings as displayed on the screenshot below. 
 Now click on Connect button there.
 Thats it you are done, Now Kali linux gets installed in your android and you can enjoy the dummy hacking environment in your android.
Uncategorized

TOP 11 VIRUSES OF ALL TIME

TOP 11 VIRUSES OF ALL TIME:
1.The Elk Cloner virus was written for Apple DOS 3.3 and spread via  
floppy disks; it displayed a short poem and was activated on its 50th use. The  
Elk Cloner virus was the first PC virus. 
2. The Brain virus was the first worldwide virus to also spread by floppy  
disks, and the two brothers in Pakistan who wrote the virus did not intend for  
it to be a destructive virus, yet despite their intentions, it materialized into one. 
3.The Melissa virus was based on a Microsoft Word Macro and was designed  
to infect e-mail messages by sending infected word documents to the first 50  
people in a user’s outlook list. The Melissa virus was reported to cause more  
than $50 million in damages to other computer users and businesses. 
4. The I Love You virus infected millions of computers in a single day sim- 
ply because the attachment stated “I Love You” and people’s curiosity caused  
them to open the infected attachment, which, when opened, would copy  
itself in different files on the user’s hard drive and also download a file that  
stole passwords from the victim. 
5. The Code Red virus was directed to attack the U.S. White House as a  
distributed denial-of-service attack, but it was stopped before it could effect  
the attack. However, this virus did infect thousands of computers and caused  
over $1 billion dollars in damages. A second version, Code Red II, attacked  
Windows 2000 and Windows NT systems. 
6. The Nimda virus was one of the fastest propagating viruses to enter the  
Internet, and its targets were Internet servers; it really worked as a worm and  
caused significant damage to many users. 
7. The Slammer virus in 2003 was a Web server virus that also roamed  
through the Internet at incredible speed. Many corporations in both the  
financial services and airline industries suffered significant losses estimated  
in the range of several billion dollars. 
8. The My Doom virus used a denial-of-service attack script and sent search  
engine requests for e-mail addresses, causing companies such as Google to  
receive millions of requests and severely slow down services and, in some  
cases, to close down companies. 
9. Worms do not change other programs, but a worm is a computer pro- 
gram that has the ability to replicate itself from computer to computer and to  
cross over to network connections. It is important to stress that while worms  
do not change other programs, they may carry other code that does change  
programs, such as a true virus.14 
10. In 2007, the “Storm” worm used social media approaches to fool com- 
puter users into situations where they loaded botnets into their computers,  
and Bruce Schneier reported that millions of computers were infected by this  
worm, which carried virus code as well. 
11. A Trojan horse is a program that masquerades as a legitimate applica- 
tion while also performing a covert function. Trojan horse programs do not  
propagate on their own, so they rely on users to accept the executables from Historical Reference Points in the Computer Industry 11 
untrusted sources. Consequently, this becomes a major social engineering  
problem
Uncategorized

A BRIEF HISTORY AND KNOWLEDGE (INTRODUCTION) ABOUT COMPUTER VIRUSES

A BRIEF HISTORY AND KNOWLEDGE (INTRODUCTION) ABOUT COMPUTER VIRUSES
A computer virus is computer code that is designed to insert itself into other  
software and, when executed, is able to replicate itself and propagate with the  
host software or file. Viruses can be designed to damage the infected host by  
corrupting files, stealing hard disk space or CPU time, logging keystrokes  
to steal passwords, creating embarrassing messages, and other activities all  
performed without the computer user’s approval or knowledge. Early viruses  
were boot sector viruses and spread by computer users sharing infected  
floppy disks. Other viruses attached to e-mail or a part of the body of an  
e-mail, and when the code viruses were executed, a message with the virus  
embedded was sent to other mail clients. In some cases, the code could be  
designed to provide the scripts access to the user’s address book and could,  
in turn, propagate and use those addresses to further propagate the virus- 
infected message. Other viruses were designed to be attached to data files  
such as word documents or spreadsheets. These scripts are visual basic code  
that can execute when the file is loaded, and once the virus has attached itself  
to an application, the code in the virus will run every time the application  
runs
Uncategorized

How To Help Protect Against Trojans

 How To Help Protect Against Trojans
━━━━━━━━━━━━━
🔗 Here are some DOs and DON\’Ts to help protect against Trojan malware. First, the DOs :
🔗 Computer security begins with installing and running an internet security suite. Run periodic diagnostic scans with your software. You can set it up so the program runs scans automatically during regular intervals.
🔗 Update your operating system’s software as soon as updates are made available from the software company. Cybercriminals tend to exploit security holes in outdated software programs. In addition to operating system updates, you should also check for updates on other software that you use on your computer.
🔗 Protect your accounts with complex, unique passwords. Create a unique password for each account using a complex combination of letters, numbers, and symbols.
🔗 Keep your personal information safe with firewalls.
🔗 Back up your files regularly. If a Trojan infects your computer, this will help you to restore your data.
🔗 Be careful with email attachments. To help stay safe, scan an email attachment first. 
🔗 A lot of things you should do come with a corresponding thing not to do — like, do be careful with email attachments and don’t click on suspicious email attachments. Here are some more don’ts.
🔗 Don’t visit unsafe websites. Some internet security software will alert you that you’re about to visit an unsafe site, such as Norton Safe Web.
🔗 Don’t open a link in an email unless you’re confident it comes from a legitimate source. In general, avoid opening unsolicited emails from senders you don’t know.
🔗 Don’t download or install programs if you don’t have complete trust in the publisher.
🔗 Don’t click on pop-up windows that promise free programs that perform useful tasks.
🔗 Don’t ever open a link in an email unless you know exactly what it is.
━━━━━━━━━━━━━
Uncategorized

Terminologies used in penitration testing

Terminologies used in penitration testing:
Exploit
An exploit is the means by which an attacker, or pen tester for that matter, takes  
advantage of a flaw within a system, an application, or a service. An attacker  
uses an exploit to attack a system in a way that results in a particular desired  
outcome that the developer never intended. Common exploits include buffer  
overflows, web application vulnerabilities (such as SQL injection), and con- 
figuration errors.
Payload
A payload is code that we want the system to execute and that is to be selected  
and delivered by the Framework. For example, a reverse shell is a payload that  
creates a connection from the target machine back to the attacker as a Win- 
dows command prompt (see Chapter 5), whereas a bind shell is a payload that  
“binds” a command prompt to a listening port on the target machine, which  
the attacker can then connect. A payload could also be something as simple as  
a few commands to be executed on the target operating system.
Shellcode
Shellcode is a set of instructions used as a payload when exploitation occurs.  
Shellcode is typically written in assembly language. In most cases, a command  
shell or a Meterpreter shell will be provided after the series of instructions  
have been performed by the target machine, hence the name.
Listener
A listener is a component within Metasploit that waits for an incoming connection  
of some sort. For example, after the target machine has been exploited, it may  
call the attacking machine over the Internet. The listener handles that connec- 
tion, waiting on the attacking machine to be contacted by the exploited system.